|
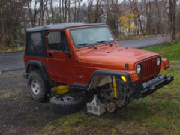
My jeep (like most) came from the factory with open differentials. This means both tires on an axle
will recieve equal torque (twisting force). BUT, if one tire is airborne or on a loose surface such as mud
or ice it requires very little torque to spin that tire. The opposite tire will recieve equally little torque,
generally not even enough to spin it. So what you've got is one tire spinning like crazy while the other doesn't move
at all. Not good. Adding a locker ensures torque to both tires ALL the time. Unless it's a selectable locker
which can be switched on and off.
Auto lockers or "lunchbox" lockers are always on. The tires on the locked axle will always spin
as fast as the driveshaft/locker is spinning. In some instances (such as cornering) one tire can and will spin
faster than the other. This is when you sometimes hear the "ratcheting" sound associated with auto lockers. This
sound is the result of the locker's teeth un-coupling. This is normal because either tire is always free to spin
faster than the other, but never slower than the driveshaft is turning it. I went with an Aussie locker because of it's price.
It's basically a clone of the lock-rite except that it costs less and is supposedly an improved design. There was never
really a question as to which axle to install it into. I have a Dana 35 rear axle which is notoriously weak. Running
large tires and a locker on it would definately be a recipe for disaster. Add to that, the fact that a locker in
the front axle is pretty much un-noticable while in 2wd (on the road) and my decision to put it into the Dana 30 was
a no-brainer.
|
| up on jack stands |
The first thing I did was chock the rear wheels, and jack the front end up onto jack stands.
I then removed the front wheels and put them under the transfer case area as an extra safety measure. I removed
the brake assemblies on each side with a 1/2" socket and a c-clamp (to compress the calipers). I used duct tape
to tape them onto the lower control arms and out of the way.
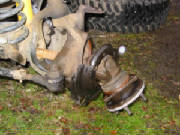
Now it was time to remove the rotors. This was my first obstacle. They were rust-frozen right
to the hubs. I took a piece of wood and a big friggin' hammer and whacked them right to left until they broke free.
I set them aside and marked which was which (driver's side/passenger's side).
Now was a good time to use plenty of PB Blaster on the 3 hub bearing bolts on each side as well as the
seam between the hub flange and steering knuckle on each side. For me, this was to be obstacle #2.
These are 1/2" twelve point bolts. I would recommend nothing but that size socket (not 13 mm).
You want a snug fit and 13 mm doesn't give that. These are in there tight, a breaker bar was definately in order.
The handle to my Hi-lift worked perfectly. After they were all out I took a flathead screwdriver and a hammer and chiseled
into the seam between the hub flange and steering knuckle near each bolt hole. Rotating from one hole to the other in
order to break the axle shaft free. Once free, I pulled it out carefully (there are oil seals in there that you don't
want to damage) about 6" or so and repeated on the other side.
|
| removing the hub bearing bolts with a breaker bar |
|
| driver's side axle shaft hanging free |
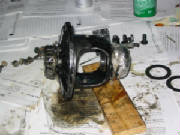
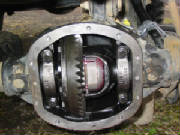
I now moved to the differential. I removed all the bolts from the cover but the top one and
smacked it ajar with a piece of wood and a hammer. After most of the fluid was out I removed the top bolt and put the
cover away to be cleaned later. I now removed the bearing caps and set them aside on a piece of paper marking which
was left & right and which was top & bottom. I wiped down the inside of the diff some
more and attempted to pry out the carrier every which way. I soon realized I had reached my next and most
difficult obstacle. This carrier would nut budge. Some fortunate people are able to just pull theirs right out,
but not me. It wasn't until someone on one of the jeep boards gave me a tip that hope returned.
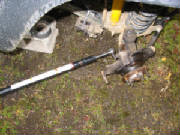
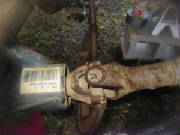
They described using the front driveshaft's power to work for me. It did. I simply wedged something (in my case,
a d-shackle pin) into the carrier. I turned the carrier until the pin was "stuck" up against the differential housing.
I then used a c-clamp on the driveshaft's u-joint to further turn it (slowly). The pressure spit that
carrier out like a watermelon seed.

|
| the pin wedged into the carrier |
|
| the c-clamp on the driveshaft's u-joint |
While I was pulling the carrier out I was careful to catch the bearing covers on each side and put them
away (marked L/R). I brought the carrier inside and wrapped the bearings on each side with cling wrap to keep debris
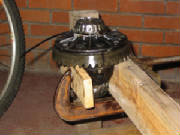
out. Now would be the time to put the carrier into a vice in order to remove the ring gear bolts, but I did not have
one. I fashioned a make-shift vice out of some wood, my trusty c-clamp, and the bottom of my homemade bike stand.
Luckily, It worked. I removed the 10 ring gear bolts with the help of my hi-lift handle as a breaker bar once again.
|
| my makeshift vice |
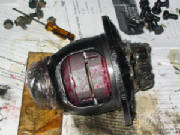
I set the ring gear aside and went to work on the carrier. Using an old drill bit that happened
to fit as a center-punch, I removed the roll pin. This pin is hollow and sort of sleeve like. With that out, I
was able to tap out the cross shaft. With the cross shaft removed, now I could strip out the 4 spider gears. They
don't get re-used, but the large thrust washers on each side do.
|
| the empty carrier |
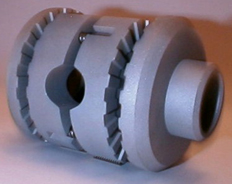
Now it was time to assemble the Aussie locker. First, I liberally coated all the parts with grease
so they would stick together. I put a spacer inside of each cam gear with the wide end placed towards the teeth.
Next, I put 2 pins into each cam gear making sure the notches were facing out. I then put everything together
inside the carrier in this order: thrust washer, left axle gear, left cam gear, right cam gear, right axle
gear, thrust washer. I used a small screwdriver to insert the 4 springs into position, inserted the cross shaft,
and re-installed the roll pin.
|
| aussie locker installed into the carrier |
I loosely installed the ring gear bolts back on (with red locktite) and went back to the makeshift
vice. I torqued the 10 bolts down in a criss/cross pattern. I now removed the cling wrap, put those covers
back onto the bearings and and made my way to the jeep. Getting the carrier back in was a beeotch. I carefully
pushed the carrier in as far as I could then had to resort to the block O' wood and big friggin' hammer trick for what seemed
like an eternity of whacking. I used paper towels to cover as much of the carrier as I could from flying
wood chips (those ring gear teeth tear up wood). After I was confident it was in all the way, I re-installed the
bearing caps.
|
| installed |
Next, I carefully worked the axle shafts back into place. I then re-installed the hub bearing bolts,
rotors, brakes and tires. I prepared the diff cover with rtv, bolted it down, and filled 'er up with fluid.
Before I took the jeep of the jack stands I tested the locker. With the driveshaft locked (transmission
& transfer case engaged), I spun one tire forward until it locked. I then spun the other tire in reverse.
The teeth of the locker should be making the ratchet sound for a rotation or so until it locks as well, which it did.
I repeated on other side. Everything was groovy, locker installed.
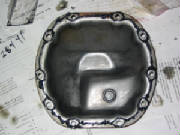
|
| diff cover ready to go back on |
No doubt, this was my most challenging mod to date. I honestly thought it would go alot smoother
and quicker. Little things like frozen rotors and stubborn hub bearing bolts hindered and frustrated me. Having
a carrier that didn't want to come out just about defeated me. Not having a vice could have forced me to travel somewhere
to use one had I not come up with my makeshift setup. In the end though, it was satisfying to jump over the many
hurdles a front locker threw at me.
UPDATE: Well, she clicks. Clickety-clicky on every substantial turn with any sort of speed.
It's not a loud click. You can't hear it with the windows up. I can honestly say it doesn't even bother me.
When people ask "what the hell is that sound?" It gives me a reason to brag about having a front locker. None
the less, I didn't expect this.
|