|
|
 |
|
Your Page Title
Optional page text here.
|
|
|
...then a few days later the other was nowhere to be found. The stock sway bar links are prone to breakage
around the ball joint, especially when the swaybar isn't at it's ideal angle (due to a lift). So now that I was
driving around without my front swaybar connected, it was time to break down and shell out the $100 or so for a nice pair
of quick disconnects.
There were only 2 brands that I considered. JKS and Teraflex. Even though the JKS qd's were
a little more, I went with them because they seemed more thought-out and refined. Not to mention, I hadn't heard a bad
word about them (aside from the price).
|
|
|
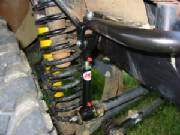
| installed |
|
| folded up |
|
|
|
|
|
There are 2 zerks on each QD, one for each bushing. They don't come greased, so the
first thing I did was pump a few shots of grease into each one and work the bushing. Now, it would normally be time
to remove the stock swaybar links. Since mine were both broken off, all I had left on each side was the top bolt with
the ball attached to it. Removing these bolts has to be the toughest part of the install because they're
force fitted. I've heard of people removing the swaybar and beating on them with a big friggin' hammer until
they pop out. I decided to go the easier route and rent-for-free a tie-rod end puller from autozone. Even then,
it wasn't exactly easy because the end of the puller was just a little wider than the swaybar and it wouldn't clamp straight.
So I ended up sticking a couple box wrenches into the mix to sort of fill the gap. That allowed a straight clamp and
after cranking down the puller a few times...POP! I repeated on the other side
|
|
|
|
|
|
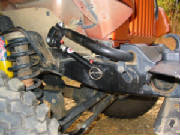
The rest of the install was easy sailing from here. I installed the U-straps onto
each side of the swaybar with the nylock nuts provided. I installed the mounting pins onto the axle mounts on each
side with nylock nuts as well. I adjusted each QD to the appropriate height (keeping the swaybar between 5 &
15 degrees above horizontal). Then I installed each QD to their U-strap and was sure to use red locktite on the
tip of those bolts.
Lastly, it was time to install a storage pin onto each side of the frame. These
are for connecting each QD to the frame when the swaybar is disconnected and folded up out of the way. I marked where
I wanted them to go. Drilled a pilot hole, then enlarged that to the right size for using a 5/16"x18 tap. The
right size being either a 17/64" drill bit or an 'F' size drill bit. I then tapped each hole (a T-handle really helps).
Before I installed the storage pins, I painted them flat black to blend into the frame better. I used some locktite
on each screw and tightened them both down.
|
|
|
|


