A Hi-Lift comes in 36", 42", 48", and 60" lengths. There are two types. All cast and cast & steel.
The all cast costs a little more and does not come in the 36" length. There are less expensive Hi-Lift knockoffs, but
when it comes to manipulating several thousand pounds I wasn't about to start penny-pinching. I went with the 48"
all cast model.
I believe the Hi-Lift should be treated like a loaded gun when in use. There must be a load of at least
150 lbs. on the jack in order to lower it "step by step", otherwise it will drop when you move the reversing latch to the
down position. Also, the handle is prone to snapping back into position. Always keep your head away from the handle's
path. If not setup correctly while lifting, a very unstable situation can occur. Just be aware, and never work
under a vehicle raised with a Hi-Lift unless there are additional supports. Using a Hi-Lift to change a tire really
isn't a good idea. The stock bottle jack is more effective and much safer (even for large tires).
Mounting
I've seen a Hi-Lift mounted many ways. Onto the front bumper, dis-assembled and placed
INTO the front bumper. Onto the rear bumper, both horizontally and vertically. Onto the spare tire, roof rack,
and even under the hood. Personally, I thought most of these places looked terrible and I wanted to keep mine inside
and away from the elements.
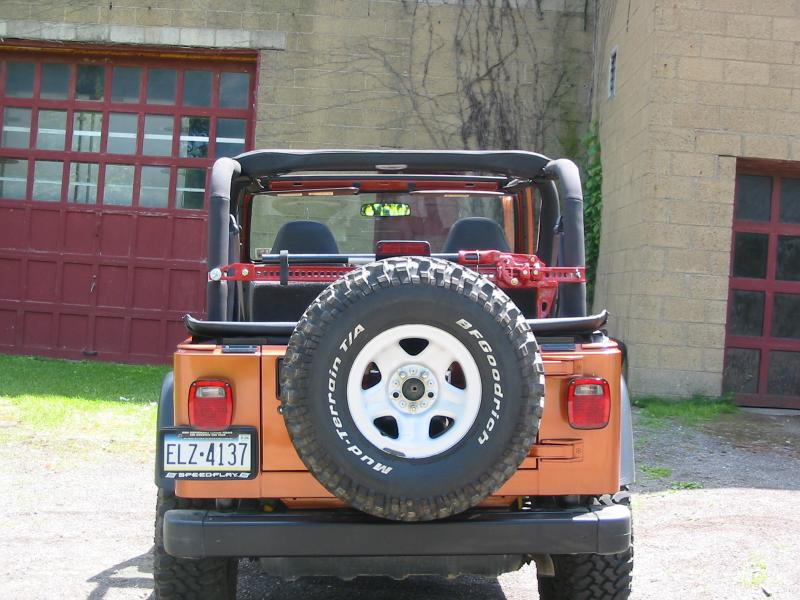
So where to mount it inside? I have a rear seat and wanted to keep the Hi-Lift somewhere
behind it. Now I was down to just a few options. Onto the wheel wells (or instatrunk if I had one) or right onto
the rollbars. I really liked the rollbar idea because that place seemed the most "out-of-the-way" and to be honest,
I thought it just looked plain cool there.
For the most part, I have seen people do this two different ways (or a combination of both).
With fence hangers (tension bands) and with muffler clamps. The fence hangers seemed too flimsy and in some cases, didn't
even appear to be tight. The muffler clamps were beefier and better fitting, but like the fence hangers, they basically
have to be loosened and retightened every time the jack is removed and re-mounted. I was interested in having clamps
that I could mount to a desired height on the rollbars, and they would stay there...period.
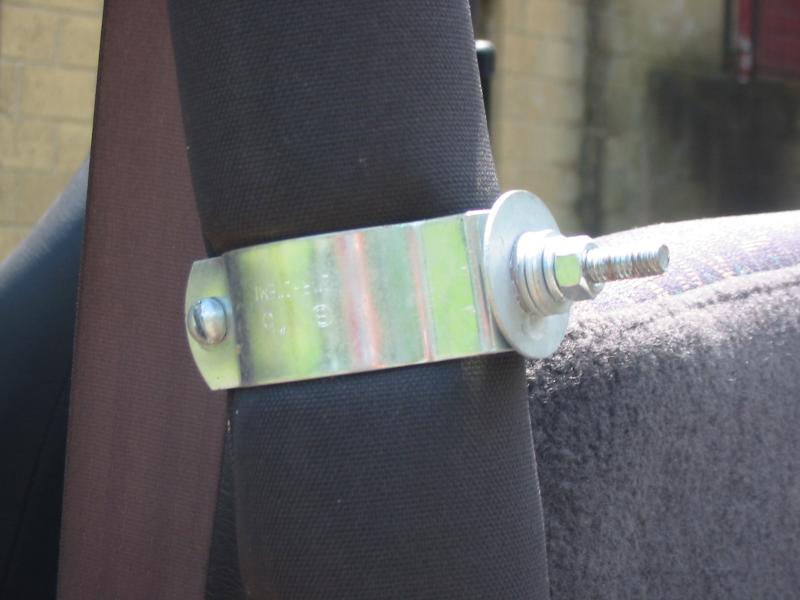
Enter conduit hangers or "conduit clamps." Many thanks to Tom aka "tsjay" for this
idea!
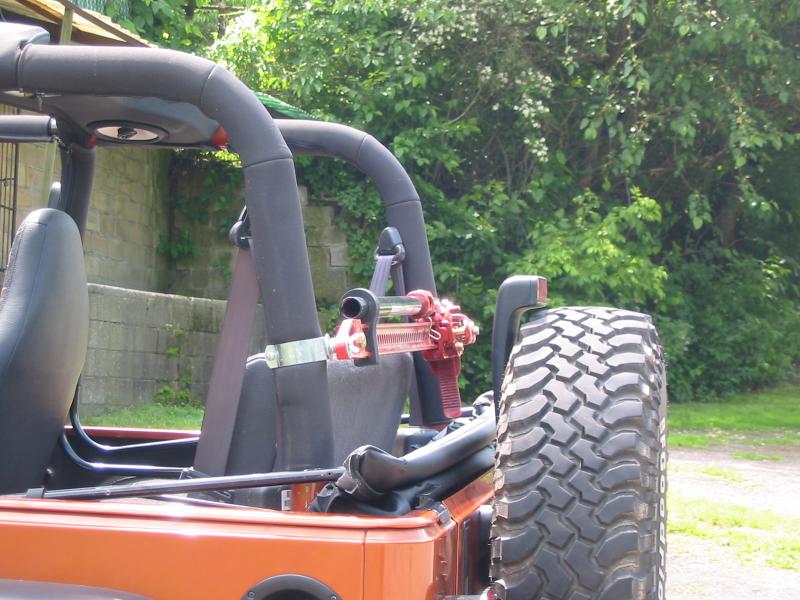
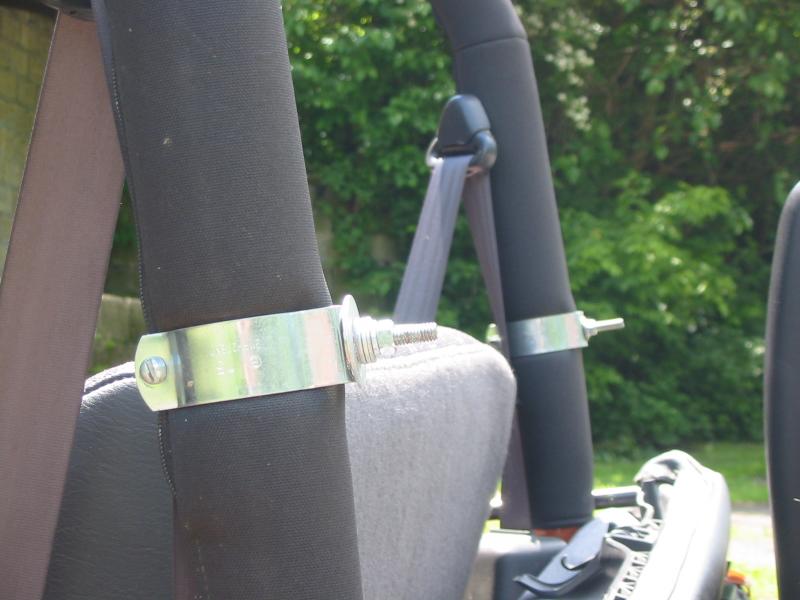
These clamps work by creating a "post" or "stud" on each rollbar to which the Hi-Lift
can easily be slid on and off. All that is needed to create the stud is a bolt, nut and a few washers. I used
a few extra washers on the top clamp's stud to compensate for the extra distance from the rollbar and to keep the Hi-Lift
bar perfectly parallel to the rollbars. I mounted the top clamp to the driver's side rollbar and the base area to the
passenger's side rollbar. The baseplate must be removed and stored elsewhere, not a big deal.
The big deal, to me, was that I would have to drill a 5/16" hole into the top clamp.
Since I would be using my Hi-Lift primarily for winching I was worried that drilling into the top clamp could possibly weaken
it. Seeing that there was really no easy way around it, and that these clamps are so perfect in every other way I went
ahead and did it. I felt better about it after seeing that the hole is more towards the tip of the clamp and away from
the inner edge (where a D-shackle will inevitably be applying pressure). Lastly, I fit the Hi-Lift up onto it's new
home and tightened it down with a couple of wingnuts. I mounted it with the jaw facing down just high enough so I can
still tuck the soft top down into place. Since removing the hi-lift is simple, I take it off before I fold
the soft-top down then re-install it. I definately plan on buying a cable lock to secure it. I purchased a "handle
hugger" to keep the handle from rattling and it will also serve as a nice safety measure by locking the handle into place
when necessary. Here's my parts list for these mounts:
(2) 2" Conduit Hangers
(2) 5/16" x 1.5" bolts
(2) 5/16" lock washers
(2) 5/16" nuts
(2) 5/16" wingnuts
various washers
Recovery
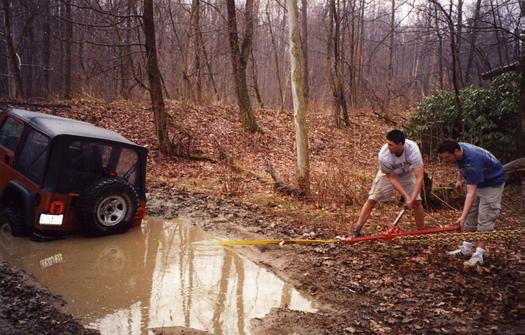
The primary reason I carry a hi-lift. Getting unstuck. When stuck, it can be used to lift
up a section of the jeep allowing room to build an elevated roadbed out of wood, rocks, etc. I built
a homemade off road base for my hi-lift out of a piece of a wood and a couple bolts and nuts. It basically makes
a bigger "footprint" and helps prevent the bottom of the jack from sinking into soft ground.
Another risky yet effective maneuver is what is known as "crab walking." It's called this because
you move the jeep sideways one end at a time sort of like a crab. To do this you jack up the center of either the front
or rear bumper until the wheels are off the ground. You then push the jeep sideways allowing the hi-lift to topple.
Depending on the terrain, you can move one end a foot or so at a time. Potential for injury or damage is high but it
works, especially in rut situations.
The hi-lift's ability to be used as a hand winch is it's best asset in my opinion. What's needed
is a couple tree-saver straps (anywhere between 6 and 10 feet each), RATED chain, and a couple D-shackles.
With a 5,000 lb winching load rating, the hi-lift should be the weakest link in the rigging.
Here's my setup:
(1) tree-saver strap 3"x 6' - (30,000 lbs)
(1) tree-saver strap 2"x 10' - (32,000 lbs)
(1) 3/8"x 20' binder chain w/grab hooks *grade 70* - (6,600 lbs)
(2) D-shackles - (9,500 lbs)
and don't forget about the tow hooks! My stock front tow hooks are rated at 7,000 lbs while
my rear tow hooks are rated at 10,000 lbs.
So now that the specs are peachy, this is how I assemble the rigging:
(the base of the hi-lift will be facing away from the vehicle)
*place an end of one of the tree-saver straps around the appropriate
tow hook
*place the other end into a d-shackle and secure that d-shackle to the
top clamp of the hi-lift
*find your winching point (tree, rock, etc.) and wrap the other
tree-saver strap around it and fasten with the other d-shackle.
*take the chain and loop it through that d-shackle and bring it
back to the hi-lift's jaw
*take up the slack by hooking the chain back onto itself
now you can move the jeep the length of the jack. the hi-lift may need to be re-rigged more
than once to get unstuck.
|